


Вот такой интересный сарафан сегодня попался мне на глаза. Красиво и очень модно. К сожалению схем нет. Описание только на английском. Но, сама идея довольно таки понятна, правда. Ничего сложного нет. Узор всегда можно подобрать и самой. Главное - необычная идея!
А в переводе вам поможет наш словарик
SIZES
XS (S, M, L, 1X, 2X)
FINISHED MEASUREMENTS:
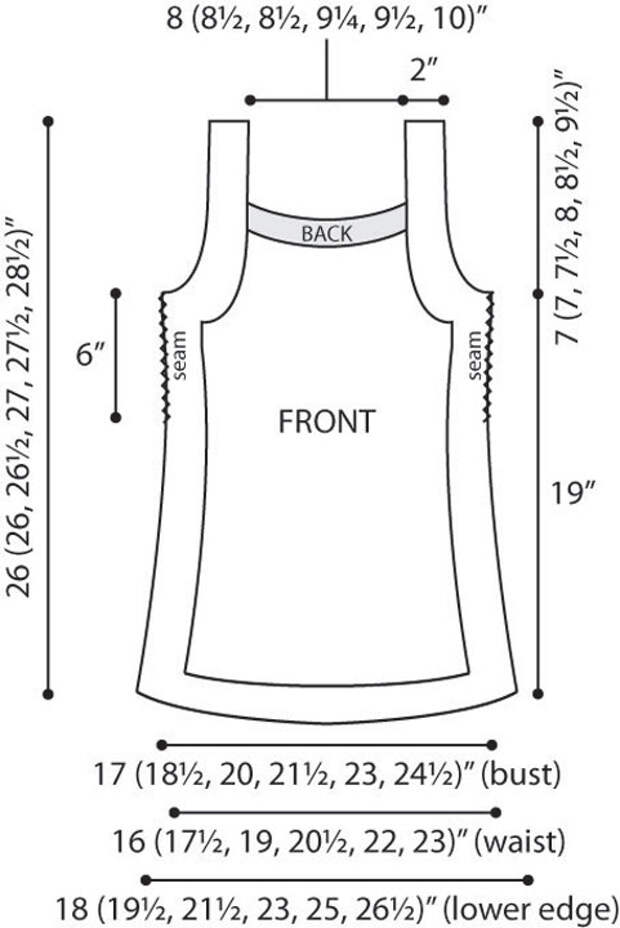
Bust 34 (37, 40, 43, 46, 49)"/86. 5 (94, 101.5, 109, 117, 124.5) cm
Length 26 (26, 26 1/2, 27, 27 1/2, 28 1/2)"/66 (66, 67.5, 68.5, 70, 72.5) cm
Note: For best fit, choose size that is closest to actual bust with 1" or less ease.
GAUGE
14 Fsc = 4"/10cm;
In Lace Stitch of upper body, 2 repeats (4 shells) = 3"/7.5cm, and 6 rows = 3 1/4"/8.5cm;
In Expanded Lace Stitch of lower body, 2 repeats (4 shells) = 3 1/2"/9cm;
In single crochet (edging), 15 sc = 4"/10cm;
In Mesh Stitch pattern of border, 8 repeats (sc, ch 1) = 4"/10cm, and 10 rows = 2"/5cm.
Note: Gauge is "as crocheted", gauge will change slightly when piece is blocked and worn. Length of piece, in particular, will increase when garment is blocked and worn.
STITCHES USED
Chain (ch), double crochet (dc), single crochet (sc), slip stitch (sl st)
SPECIAL TERMS
Fsc: Foundation single crochet (This technique creates a foundation chain and a row of single crochet stitches in one) –
Step 1: Place a slip knot on hook, ch 2, insert hook in 2nd ch from hook and draw up a loop; yarn over and draw through one loop on hook (the "chain"); yarn over and draw through 2 loops on hook (the "single crochet").
Step 2: The following stitch is worked under the forward 2 loops of the stem of the previous stitch (into the "chain"). Insert hook into the face of the "chain" and under the nub at the back of the "chain", draw up a loop, yarn over and draw through one loop on hook (the "chain"), yarn over and draw through 2 loops on hook (the "single crochet"). Repeat for the length of foundation.
To add Fsc to the end of a row (for underarms and straps): Ch 1 (as instructed), insert hook in the stem of the stitch just made (under 2 forward strands, just beneath the top loops), draw up a loop, yarn over and draw through one loop on hook (the "chain"), yarn over and draw through 2 loops on hook (the "single crochet"). Make remaining Fsc as above.
sc2tog: Single crochet 2 together—Insert hook in next stitch, yarn over and pull up a loop, (2 loops on hook), insert hook in next stitch, yarn over and pull up a loop, yarn over and draw through all 3 loops on hook.
shell: 3 dc in indicated stitch.
V-st: (Dc, ch 2, dc) in indicated stitch.
PATTERN STITCHES
Lace Stitch (for upper body)
Use the following three rows to work pattern even, without increases:
Row A: Ch 3 (counts as dc here and throughout), sk first dc, shell in next dc, *sk next (ch-3, sc, ch-3), shell in next 2 dc; repeat from * across, end with shell in next to last dc, dc in 3rd ch of turning ch, turn.
Row B: Ch 3, sk first dc, V-st in next dc, *sk next 4 dc, V-st in next 2 dc; repeat from * across, end with V-st in next to last dc, dc in 3rd ch of turning ch, turn.
Row C: Ch 3, sk first dc, dc in next dc, sk next (ch-2 and dc), *ch 3, sc in next sp between V-sts, ch 3, sk next (dc and ch-2), dc in next 2 dc; repeat from * across, working last dc in 3rd ch of turning ch, turn.
Use the following three rows to increase one stitch pattern repeat on each end over three rows:
Row D: Ch 3, dc in first dc, shell in next dc, *sk next (ch-3, sc, ch-3), shell in next 2 dc; repeat from * across, end with shell in next to last dc, 2 dc in 3rd ch of turning ch, turn.
Row E: Ch 3, dc in first dc, *V-st in next 2 dc, sk next 4 dc; repeat from * across to last 3 dc, end with V-st in next 2 dc, 2 dc in 3rd ch of turning ch, turn.
Row F: Ch 3, dc in first dc, ch 3, sk next dc, *sc in next sp between dc, ch 3, sk next (dc and ch-2), dc in next 2 dc, ch 3, sk next (ch-2 and dc); repeat from * across, end with sc in next sp between dc, ch 3, sk next to last dc, 2 dc in 3rd ch of turning ch, turn.
Expanded Lace Stitch (for lower body)
Use the following three rows to expand the stitch pattern for lower body
Row G: Ch 3, sk first dc, shell in next dc, ch 1, *sk next (ch-3, sc, ch-3), shell in next 2 dc, ch 1; repeat from * across, end with shell in next to last dc, dc in 3rd ch of turning ch, turn.
Row H: Ch 3, sk first dc, V-st in next dc, ch 1, *sk next 4 dc, V-st in next 2 dc, ch 1; repeat from * across, end with V-st in next to last dc, dc in 3rd ch of turning ch, turn.
Row I: Ch 3, sk first dc, dc in next dc, sk next (ch-2 and dc), *ch 3, sc in next ch-1 sp between V-sts, ch 3, sk next (dc and ch-2), dc in next 2 dc; repeat from * across, working last dc in 3rd ch of turning ch, turn.
Mesh Stitch (for border)
Round 1: Join yarn with sc in first corner ch-1 sp, *ch 1, [sc in next ch-1 sp, ch 1] across to next corner marker, (sc, ch 1, sc) in marked corner ch-1 sp; repeat from * 7 more times, omitting last corner, instead end with sc in same ch-1 sp as first sc, ch 1; sl st in first sc.
NOTES
1. Back and front are worked separately then assembled into one piece with a wide border and straps that connect front and back necks. To create the tabard silhouette the sides are seamed for a few inches.
2. Work begins at the neck with a stretchy foundation, and proceeds downwards to underarm shaping and then to lower edge. The first row squeezes more stitch pattern repeats across the foundation than usual. This will cause the neck to curve, as desired to achieve shape and fit.
BACK
Bodice
With A, Fsc 30 (32, 32, 35, 37, 38), turn foundation over so sc edge is on top, begin work across sc edge.
Size XS only:
Row 1 (RS): Ch 3 (counts as first dc), (dc, ch 2, dc) in first sc (V-st made), sk next 3 sc, [V-st in next 2 sc, sk next 3 sc] 5 times, end with (V-st, dc) in last sc, turn—6 pattern repeats.
Rows 2–8: Work Row C of Lace Stitch, then Rows A–C twice.
Size S only:
Row 1 (RS): Ch 3 (counts as first dc), sk first sc, (dc, ch 2, dc) in next sc (V-st made), sk next 3 sc, [V-st in next 2 sc, sk next 2 sc] 5 times, end with V-st in next 2 sc, sk next 3 sc, V-st in next sc, dc in last sc, turn—7 pattern repeats.
Rows 2–8: Work Row C of Lace Stitch, then Rows A–C twice.
Size M only:
Row 1 (RS): Ch 3 (counts as first dc), sk first sc, (dc, ch 2, dc) in next sc (V-st made), sk next 3 sc, [V-st in next 2 sc, sk next 3 sc] 5 times, end with V-st in next sc, dc in last sc, turn—6 pattern repeats.
Rows 2–8: Work Row C of Lace Stitch, then Rows A–F—8 pattern repeats.
Size L only:
Row 1 (RS): Ch 3 (counts as first dc), 3 dc in first sc (shell made), sk next 3 sc, [shell in next 2 sc, sk next 3 sc] 6 times, end with (shell, dc) in last sc, turn—7 pattern repeats.
Rows 2–9: Work Rows B and C of Lace Stitch, then Rows A–F—9 pattern repeats.
Size 1X only:
Row 1 (RS): Ch 3 (counts as first dc), 3 dc in first sc (shell made), [sk next 3 sc, shell in next 2 sc] 2 times, [sk next 2 sc, shell in next 2 sc] 4 times, sk next 3 sc, shell in next 2 sc, sk next 3 sc, (shell, dc) in last sc, turn—8 pattern repeats.
Rows 2–9: Work Rows B and C of Lace Stitch, then Rows A–F—10 pattern repeats.
Size 2X only:
Row 1 (RS): Ch 3 (counts as first dc), sk first sc, (dc, ch 2, dc) in next sc (V-st made), sk next 2 sc, [V-st in next 2 sc, sk next 2 sc] 8 times, end with V-st in next sc, dc in last sc, turn—9 pattern repeats.
Rows 2–11: Work Row C of Lace Stitch, then Rows A–C once, then Rows A–F—11 pattern repeats.
Body
All Sizes: Fasten off. Turn. Begin with A.
shape underarm
Note: In the next row, short foundations are worked on each end to shape underarm.
Row 1: With A, Fsc 4, shell in first dc, [shell in next dc, sk next (ch-3, sc, ch-3), shell in next dc] 6 (7, 8, 9, 10, 11) times, end with shell in 3rd ch of turning ch, ch 1, Fsc 4, turn.
Row 2: Ch 3, sk first sc of foundation, V-st in next sc, sk remaining 2 sc, [sk first 2 dc of next shell, V-st in next 2 dc, sk remaining 2 dc of shell] 7 (8, 9, 10, 11, 12) times, sk next 2 sc of foundation, V-st in next sc, dc in last sc, turn—8 (9, 10, 11, 12, 13) pattern repeats.
Rows 3–12: Work Row C of Lace Stitch, then Rows A–C three times.
Rows 13–31: Work Rows G–I of Expanded Lace Stitch 6 times, then Row G once more. Do not fasten off.
Fit Tip: For longer or shorter body, add or omit rows by adding or omitting repeats of Rows G–I of Expanded Lace Stitch, end by working Row G once more.
Edging
Notes:
1. Until this point, there is no obvious RS or WS. The last row of the body is now the RS.
2. In the next round sc are worked evenly down side edge, across neck edge, and up other side edge. As you work the edging, place a marker in the 2nd sc of each 3-sc corner.
3. If you have altered the length of the body, adjust the edging accordingly, as your sc count will different.
Round 1 (RS): Continue with A, rotate piece to work in edges of rows across body side edge, ch 1, 2 sc in first dc row edge, 2 sc in next 29 dc row edges to underarm foundation, sc in sc row edge of foundation; working across underarm foundation, 3 sc in first foundation ch (for corner), place marker in center sc of 3-sc corner, sc in next 3 ch; working in edges of rows across bodice side edge, 2 sc in next 9 (9, 9, 10, 10, 12) dc row edges to neck foundation, sk sc row edge of neck foundation; working across neck foundation, 3 sc in first foundation ch (for corner), place marker in center sc of 3-sc corner, sc in next 28 (30, 30, 33, 35, 36) ch, 3 sc in last ch (for corner), place marker in center sc of 3-sc corner; working in edges of rows across other bodice side edge, sk sc row edge of neck foundation, 2 sc in next 9 (9, 9, 10, 10, 12) dc row edges to underarm foundation; working across underarm foundation, sc in next 3 ch, 3 sc in last ch (for corner), place marker in center sc of 3-sc corner; working in edges of rows across other body side edge, sc in sc row edges of underarm foundation, 2 sc in next 30 dc row edges—62 sc from lower edge to marker at underarm corner, 23 (23, 23, 25, 25, 29) sc between markers at underarm and neck corners (not counting marked corner sc). Fasten off.
FRONT
Bodice
With A, Fsc 30 (32, 32, 35, 37, 38), turn foundation over so sc edge is on top, begin work across sc edge.
Row 1: Work Row 1 of back bodice for respective size—6 (7, 6, 7, 8, 9) pattern repeats.
Sizes XS (S) only:
Rows 2–5: Work Row C of Lace Stitch, the Rows A–C—6 (7) pattern repeats.
Size M only:
Rows 2–5: Work Rows C–F of Lace Stitch—8 pattern repeats.
Sizes L (1X) only:
Rows 2–6: Work Rows B–F of Lace Stitch—9 (10) pattern repeats.
Size 2X only:
Rows 2–8: Work Row C of Lace Stitch, then Rows A–F—11 pattern repeats
Body
Work same as back body to edging—8 (9, 10, 11, 12, 13) pattern repeats.
Note: If you altered the length of the back, remember to do the same for the front.
Edging
Work edging same as back edging, except when edging sides of front bodice, work 2 sc in each of 6 (6, 6, 7, 7, 9) dc row edges between underarm and neck foundations—62 sc from lower edge to marker at underarm corner, 17 (17, 17, 19, 19, 23) sc between markers at underarm and neck corners (not counting marked corner sc). Fasten off.
BORDERS AND STRAPS
Notes:
1. The wide border is made continuously around front and back pieces, connecting at the neck with straps made in one with the border.
2. Work begins at lower corner of front, to work across side edge of front body. In later rounds, decreases are worked at each armhole edge of bodice, to keep the border flat and avoid gapping.
3. As each round is worked, move markers at each corner into the sc or ch-1 sp at the center of each corner.
Fit Tip: The underarms will eventually be built up 2"/5cm higher with the borders. But you may adjust the underarm drop here. For higher underarms, make the straps shorter by omitting Fsc in multiples of 2. For lower underarms, make the straps longer by adding Fsc in multiples of 2.
Hold pieces with WS facing. Place front and back lengthwise beside each other, with the neck edges side by side in the center.
Round 1 (WS):
First side: Join B with sc in first sc at lower corner of front to work across side of front, work 2 more sc in same sc (for corner), sc in next 61 sc to marker at underarm corner, 3 sc in marked sc (for corner), sc in next 5 sc, sc2tog, [sc in next 3 sc, sc2tog] 0 (0, 0, 1, 1, 1) time(s), sc in next 10 (10, 10, 7, 7, 11) sc to marker at neck corner, sc in marked corner sc; for strap, ch 1, Fsc 35 (35, 37, 37, 39, 39), taking care not to twist strap foundation, sc in corresponding marked corner sc of back; working across side of back, sc in next 16 (16, 16, 13, 13, 17) sc, [sc2tog, sc in next 3 sc] 0 (0, 0, 1, 1, 1) time(s), sc2tog, sc in next 5 sc to marker at underarm corner, 3 sc in marked sc (for corner), sc in next 61 sc, 3 sc in last sc (for corner); do not turn and do not fasten off.
Back Lower Edge: Rotate piece to work across lower edge of back.
Sizes XS (M, 1X) only: sk first dc.
All Sizes: Sc in next 3 (4, 3, 4, 3, 4) dc, sc in next ch-1 sp, [sc in next 6 dc, sc in next ch-1 sp] 7 (8, 9, 10, 11, 12) times, sc in last 4 dc—56 (64, 70, 78, 84, 92) sc across lower edge of back.
Second Side: Rotate piece to work across other side of back, 3 sc in first sc of side (for corner), sc in next 61 sc to marker at underarm corner, 3 sc in marked sc (for corner), sc in next 5 sc, sc2tog, [sc in next 3 sc, sc2tog] 0 (0, 0, 1, 1, 1) time(s), sc in next 16 (16, 16, 13, 13, 17) sc to marker at neck corner, sc in marked sc (for corner); for strap, ch 1, Fsc 35 (35, 37, 37, 39, 39), taking care not to twist strap foundation, sc in corresponding marked corner sc of front; working across side of front, sc in next 10 (10, 10, 7, 7, 11) sc, [sc2tog, sc in next 3 sc] 0 (0, 0, 1, 1, 1) time(s), sc2tog, sc in next 5 sc to marker at underarm corner, 3 sc in marked sc (for corner), sc in next 61 sc, 3 sc in last sc (for corner).
Front Lower Edge: Rotate piece to work across lower edge of front.
Sizes XS (M, 1X) only: sk first dc.
All Sizes: Sc in next 3 (4, 3, 4, 3, 4) dc, sc in next ch-1 sp, [sc in next 6 dc, sc in next ch-1 sp] 7 (8, 9, 10, 11, 12) times, sc in last 4 dc; sl st in first sc of border—56 (64, 70, 78, 84, 92) sc across lower edge of front. Fasten off. Turn.
Note: Exact stitch count is not absolutely critical, but as you begin the Mesh Stitch pattern in the next round, everything will work without fudging if there's an odd number of sc between markers from corner to corner (not counting marked corner sc).
Round 2 (RS): Sk back 2 sc to corner marker at lower front, join C with sc in marked sc; working across lower edge of front, ch 1, [sk next sc, sc in next sc, ch 1] across to next marker at other corner of lower edge, *(sc, ch 1, sc) in marked corner sc (for corner), move marker into ch-1 sp just made*; working across side edge, ch 1 [sk next sc, sc in next sc, ch 1] across to next marker at underarm, repeat from * to * (for corner); working across armhole edge of front, side of strap, and armhole edge of back, ch 1, [sk next sc, sc in next sc, ch 1] across to next marker at underarm of back; repeat from * to * (for corner); working across side edge, ch 1 [sk next sc, sc in next sc, ch 1] across to next marker at lower corner of back; repeat from * to * (for corner); ch 1, sk next sc, sc in next sc, ch 1] across to next marker at other corner of lower edge; repeat from * to * (for corner); working across side edge, ch 1 [sk next sc, sc in next sc, ch 1] across to next marker at underarm, repeat from * to * (for corner); working across armhole edge of back, side of strap, and armhole edge of front, ch 1, [sk next sc, sc in next sc, ch 1] across to next marker at underarm of front; repeat from * to * (for corner); working across side edge, ch 1 [sk next sc, sc in next sc, ch 1] around, sc in same sc as first sc, ch 1; sl st in first sc. Fasten off. Turn.
Round 3 (WS): With A, work Round 1 of Mesh Stitch pattern.
Note: In next round, decreases are worked at each armhole edge of bodice, to keep the border flat and avoid gapping. Take care to work in mesh pattern to next marked underarm corner as instructed. Continue in mesh pattern when encountering the other lower corner markers.
Round 4 (RS): Join B with sc in first corner ch-1 sp, *ch 1, [sc in next ch-1 sp, ch 1] across to next underarm corner marker, (sc, ch 1, sc) in marked underarm corner ch-1 sp, [ch 1, sc in next ch-1 sp] 3 times, do not ch 1, sc in next ch-1 sp, [ch 1, sc in next ch-1 sp] across to 3 ch-sps before next underarm corner marker, do not ch 1, sc in next ch-1 sp, [ch 1, sc in next ch-1 sp] 2 times, ch 1, (sc, ch 1, sc) in marked underarm corner ch-1 sp; repeat from * once more, **ch 1, [sc in next ch-1 sp, ch 1] around, sc in same ch-1 sp as first sc, ch 1; sl st in first sc. Fasten off. Turn.
Round 5 (WS): With C, work Round 1 of Mesh Stitch pattern. Fasten off. Turn.
Round 6 (RS): With A, work Round 1 of Mesh Stitch pattern. Fasten off. Turn.
Round 7 (WS): With B, work Round 1 of Mesh Stitch pattern. Fasten off. Turn.
Round 8 (RS): With C, repeat Round 4 (omitting ch-1 sp at each armhole in same way). Fasten off. Turn.
Round 9 (WS): With A, work Round 1 of Mesh Stitch pattern. Fasten off. Turn.
Round 10 (RS): Join B with sc in first ch-1 sp, sc in each sc and in each ch-1 sp around, working 3 sc in each marked corner ch-1 sp, end with 2 sc in same ch-1 sp as first sc; sl st in first sc. Fasten off.
FINISHING
Side Seams
Fit Tip: The tabard style of this vest is meant to hang open from the waist, with the seam ending somewhere between the fullest part of the bust and the narrowest part of the waist. How long you make the side seams is a matter of personal taste. To keep your options open, you can seam the sides as instructed, leaving a long tail and making a temporary fasten off. Try on the vest then decide if you want to add or remove stitches from the seams.
Hold front and back together, matching markers at underarm corners, matching sc of body down each side. With B, sew mattress seam from underarm marker for approximately 6"/15cm, or for length of side seam desired. Fasten off. Sew seam across other side in same way. Weave in ends. Block best to finished measurements (shown on schematic).
Using yarn needle, weave in all ends.
Свежие комментарии